A Raspberry Pi Temperature Monitoring Experiment in the Fridge
Introduction
This experiment happened because I wondered how the temperature inside the fridge changes as part of the internal temperature regulation and how it is affected by opening and closing the door of the fridge. At first, I thought to just buy a commercial product - I was OK to spend 100 USD or so - and put it into the fridge and look at the result somehow. However, and I think it is pretty strange, there is no such simple low cost commercial product to monitor the temperature continuously, and by continuous I mean a temperature measurement done every second. I am not even sure if there is any such commercial product, independent of the cost, but there should be. The need is simple, just measure the ambient temperature every second and save or send this measurement somewhere so it can be analyzed later. However, all not too expensive, under 500 USD or so, commercial products for temperature monitoring have one of the following issues:
- They are showing only the current temperature, so no logging. These are simple indoor, outdoor, room, fridge etc. thermometers.
- They are logging only to their internal memory and then they can generate a PDF report. The raw data is also sometimes accessible using a special software (and sometimes also using special interface kits). These devices are usually limited to measure every 30 seconds at best. They also have limited memory, so even if they can measure every second, their memory would not be enough to store all the measurements for even 12h.
- They are logging to (their) cloud so it can be analyzed later. However, such devices also have limited sampling rate, they can also measure every 30 seconds at best. Since the manufacturer also provides the cloud environment, sometimes you also need to pay separately for this depending on the storage requirements.
- The low cost ones might have questionable accuracy and/or precision.
On the other hand, commercial products have some advantages:
- They are calibrated at the factory, so they are accurate to whatever their spec. says, but of course in order to be accurate they have to be recalibrated every year or so.
- They are certified to some standards such as HACCP to be used in food industry.
- They might have special probes, for example in order to minimize the fluctuations in the cold storage such as fridges, e.g. some professional ones include sensors immersed in a liquid.
However, as a home user, I do not need a certification and I actually do care about the fluctuations so the last two points are meaningless. The first is very important but because it requires recalibration that is also becoming not important in the long term. It is better to buy a calibratable thermometer so I can measure the deviations of these sensors myself. Also, at least a few sensors I am using say they are already calibrated or no calibration is needed.
A high quality device logging the measurements internally is usually over 100 USD and a device logging to cloud is over 200 USD. Like I said, these can measure usually every 30 seconds, rarely you can find a device that can measure every 10 seconds. Anything beyond this, higher sampling rate, higher memory, logging to cloud, will cost more, or much more.
Not surprisingly it is easy to make a temperature data logger using a Raspberry Pi, so I decided to go this route. Other than measuring the conditions inside the fridge, I get two extra results from this experiment: 1) whether or not RPi can be used close to zero degrees -and also subzero, in the deep freeze compartment- and how long it can function with a battery and 2) how different sensors perform.
Setup
This experiment basically needs a few components:
- a Raspberry Pi, since there will be no wired connection into the fridge, either it has to log the data internally or it has to support WiFi, and it should be battery powered
- a battery to power RPi
- one or more temperature sensors
- if the measurements are not saved but sent (over network), a system to keep these measurements
So my solution includes these (with their approximate US prices):
- a Raspberry Pi 3B+ (35 USD). I keep it in its plastic box/enclosure. (9.95 USD)
- a high capacity battery, Xtorm XB-303 is 26.000mAh. (139 EUR, not sure if available in US)
- SparkFun Pi Wedge (10.95 USD)
- One full size breadboard (5.95 USD), one half size breadboard (5.00 USD)
- although it is not needed, I decided to use many sensors to see the difference between them:
- Analog Devices ADT7410 (5.95 USD)
- Bosch BME680 (22.50 USD)
- Microchip MCP9808 (4.95 USD)
- Sensiron SHT31-D (13.95 USD)
- monitoring system / time-series database, I am using Graphite Carbon, installed on (Ubuntu 19.10) Linux
- time-series data visualization tool, I am using Grafana, installed on (Ubuntu 19.10) Linux
SHT31-D can also measure humidity and BME680 can measure humidity and air quality.
I also thought to use an RTD sensor, either a PT100 or PT1000 with MAX31865, but I kept it simple for the moment.
First important question is if the components (RPi, battery and sensors) inside the fridge work properly in fridge temperatures, around 4-5C. I have asked Xtorm about the battery and they said from the operating point of view it should be OK but of course the performance will be diminished. All sensors naturally support operating near 0C, usually their range is between -20C and +70C without any concern.
What about RPi ? There is a question in RPi FAQ about this and they say ARM SoC can operate from -40C and +85C, but for example LAN9514 IC on previous RPis can operate only from 0C and 70C. Raspberry Pi 3B+ does not use LAN9514 but LAN7515 which works from -40C to 85C, and it uses CYW43455 for WiFi and Bluetooth and it can operate from -30C to +85C and its optimal performance is between -20C and +75C. So, again assuming all other passive and supporting active components can work from -20C or so, I assume it is not going to be a problem to put it inside the fridge.
For this experiment I will measure the temperature only at one level, the bottom shelf, at the lowest level over vegetable basket which is the coldest place in the fridge. A more complete experiment would be to measure it at the top and bottom shelves simultaneously to see the temperature difference. I was also not planning to measure the temperature in the deep freeze compartment at the beginning, but I did.
The assembly is simple, but there is an issue to keep in mind. I soldered the pin headers to sensor boards and mounted them on a breadboard. I am using Sparkfun Pi Wedge to connect RPi to the breadboard and then use a few jumper wires for all other connections. Then using the battery and a short USB cable to power RPi. The issue is that the heat due to Raspberry Pi or cables/wires may affect the performance of the sensors. So they should be put as far away from these heat sources as possible. More on this later.
Graphite Carbon storage schema (/etc/carbon/storage-schemas.conf) is configured to have a retention of 1s:7d.
I wrote a simple python program, using adafruit libraries, to read the temperature and humidity values from the sensors and send them to carbon listener in plain text. This is repeated in an infinite loop without a sleep. This is a bit unnecessary since I do not need or actually I cannot query the sensors this much (more than once a second) but I kept it simple.
Sensors
These are the sensors I am using:
| Sensor | Best Temperature (T) Accuracy | Calibrated? | Response Time |
|---|---|---|---|
| Analog Devices ADT7410 | +/- 0.4C | No calibration needed, so I guess that means effectively Yes | <1s |
| Bosch BME680 | +/- 0.5C | (I think) temperature offset needed depending on the application | not given for T |
| Microchip MCP9808 | +/- 0.5C | (I think) temperature offset needed depending on the application | <1s |
| Sensiron SHT31-D | +/- 0.2C | Yes | >2s for T |
I query the sensors more often than 1 second and this does not cause any problem. Probably it returns the last value if the new measurement is not ready yet.
Location of the sensors
I first put all the components (battery, RPi, breadboard where sensors stay) into a plastic box. Because the battery is quite large, I put the battery first, than RPi in its enclosure on top of the battery, and the breadboard on top of the Raspberry Pi enclosure. I thought since they are going into the fridge and they are not on the same PCB, the effects of generated heat on sensors would be small. I was wrong, and it was difficult to diagnose.
Unfortunately I did not take a photo of this setup but it is like this. A 40-pin cable is going from Raspberry Pi to Pi Wedge, Pi Wedge is staying on a (full size) breadboard and on the same breadboard the sensors are staying in a line one after other in this order: ADT7410, MCP9808, BME680 and SHT31-D.
As you can see from the data up, there is a large difference between the reported values from the sensors. I first thought this is normal and the values are just offset that should be manually corrected in the code, but there is a very large difference which is questionable. Also, the order in the chart, the worst (the top one, ADT 7410) to the best (the bottom one, SHT 31-D), is same as their place on the breadboard. ADT 7410 is the most close to Pi Wedge. So it looks like there is something going on. To figure this out, I changed the location of SHT31-D and ADT 7410, and I got the data below.
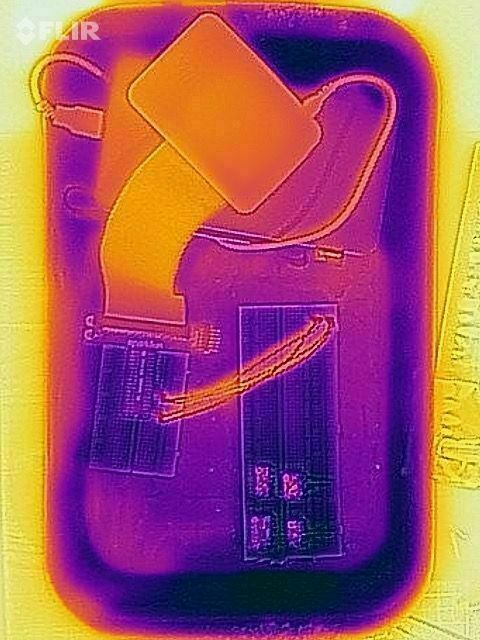
As you clearly see, the reported values are exchanged. Now, ADT 7410 is the best, SHT31-D is the worst. So this is definitely a layout/placement issue. Unfortunately, it is very difficult to “see” this issue quantitatively with bare eyes, without proper equipment. Fortunately, I have an equipment to see this, FLIR ONE Thermal Camera for iOS. This is the situation:
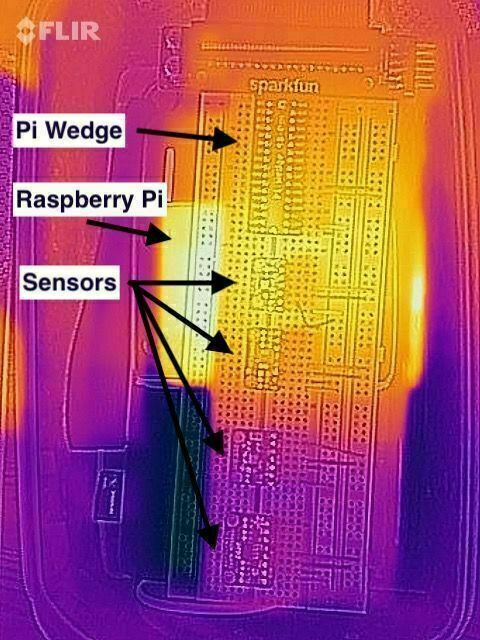
Thermal image: when the breadboard is staying over Raspberry Pi’s enclosure
Lesson learned: even inside its box and without any load, Raspberry Pi is warm comparing to ambient and this can easily heat anything over.
Then, it should be easy, just do not put the breadboard over anything. Not so simple.
Thermal image: breadboard staying alone
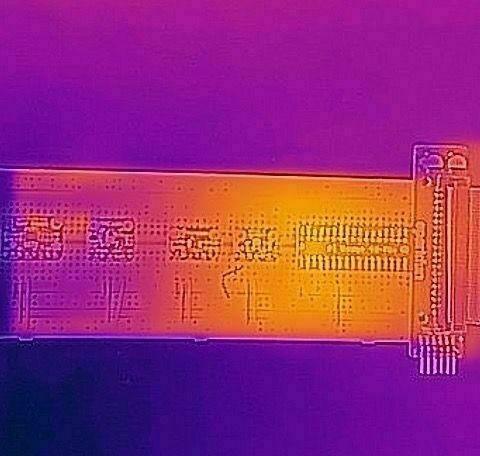
So even if the breadboard is not staying over anything warm, Pi Wedge is warm. So I should minimize the connections. I decided to put Pi Wedge into another breadboard and just use the required I2C connections (4 wires, VDD, GND, SCL and SDA) to connect the breadboard containing the sensors.
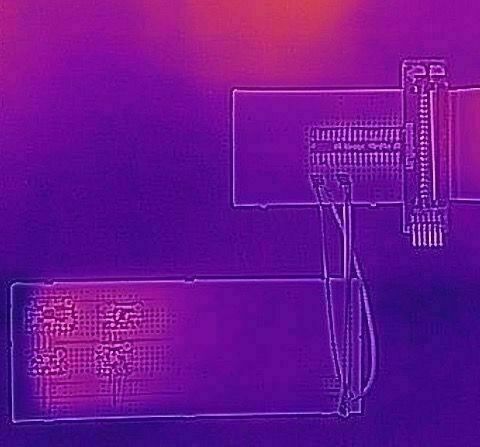
Thermal image: two breadboards
It looks much better. As you might have realized, I also moved the sensors as far away from the connections, thinking the breadboard may radiate this heat away until it arrives to sensors.
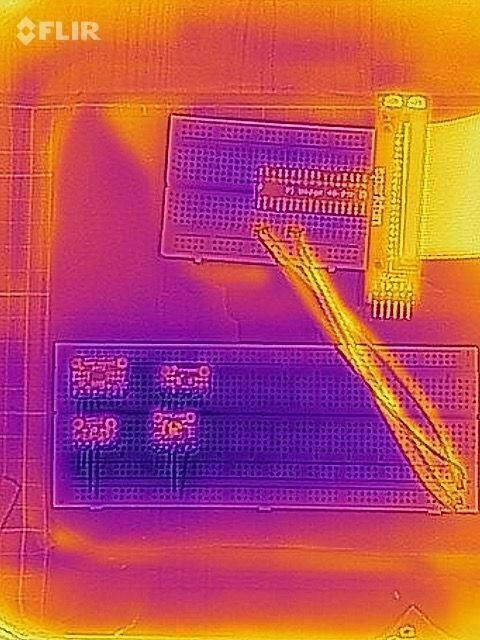
Thermal image: just after staying in the fridge
I like this image. It is so obvious the 40-pin connector and the I2C connections (4 wires) from the Pi Wedge breadboard to sensor breadboard is warm comparing to sensors. This is why I tried to put the sensors as far away from any wires coming from Raspberry Pi.
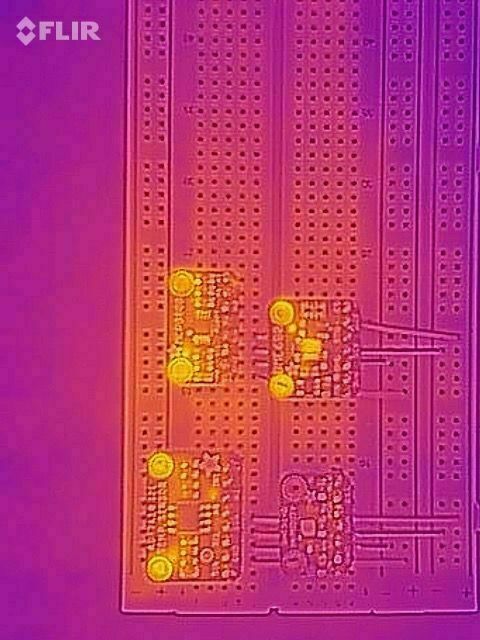
Thermal image: sensors
I am not sure about this image above, but it is interesting. It just shows the sensors and the one on bottom right is SHT31-D. It looks like it stays cooler than others, but I do not think it is very important as you will see the results.
In order to put all these into a short summary image, here is a graph showing the bad layout first, then the correct one. On the left, you see the sensors report considerable different values, on the right, you see they pretty much report the same.
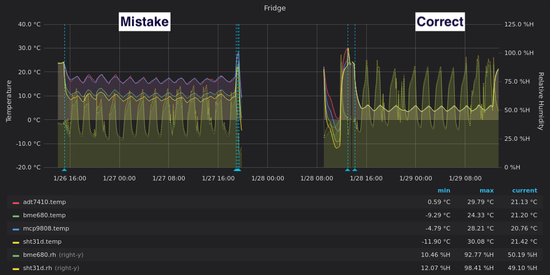
Before and after fixing the location of the sensors
Method
I have fully charged the battery and then put all of them into a large glass container paying attention to mistakes above. So the Raspberry Pi is staying on the battery, where Pi Wedge is connected to it, and 4 wires connects the Pi Wedge breadboard to the breadboard of sensors. I used the same setup two times, once at the bottom shelf of the fridge and once in the deep freeze compartment.
Results
Raspberry Pi in the fridge
Raspberry Pi, battery and the sensors are working without any problem in the fridge (around 3-4C) and in the deep freeze compartment (around -18C). The battery, having 26.000 mAh capacity, powers the system in the fridge at least 24h (I did not keep it in the deep freeze compartment that long). It is actually a bit more than 24h, but not 48h. I did no optimization, particularly querying the sensors continously, sending these data everytime, and while doing that opening and closing the network socket with every measurement probably has a considerable negative impact on power usage.
Temperature sensor adaptation
Here is how the temperature sensors adapt when put into the fridge:
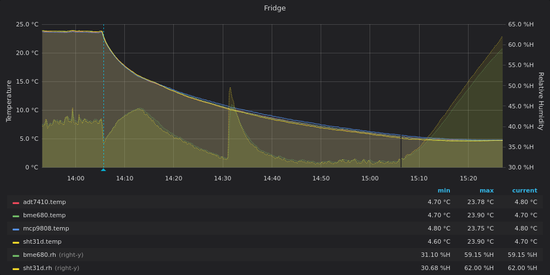
From room temperature to the fridge
It takes a bit more than 60 minutes for temperature sensors to report fridge temperatures.
And here is how the temperature sensors adapt when taken out from the fridge:
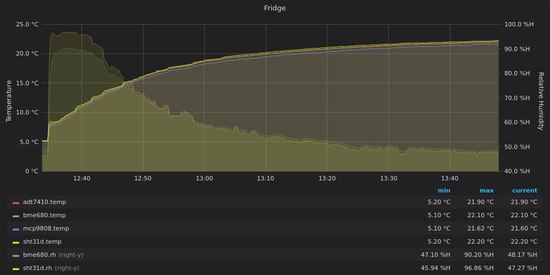
From the fridge to room temperature
It takes a bit more than 60 minutes for temperature sensors to report room temperatures.
Temperature regulation of the fridge in the night
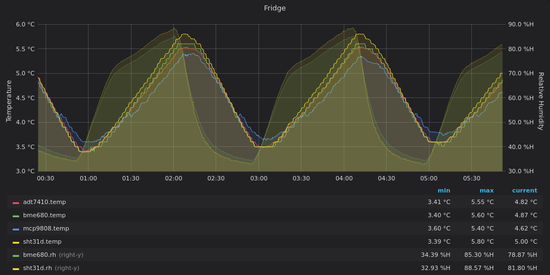
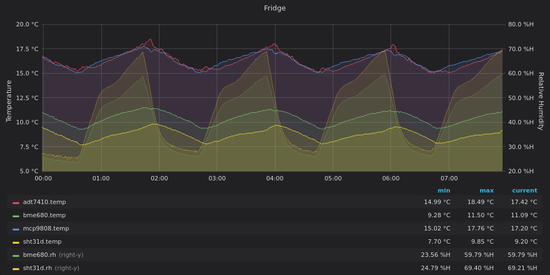
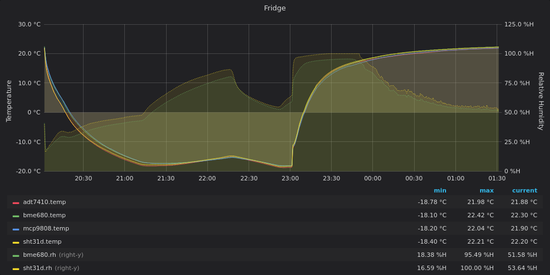
The fridge in the night
This is maybe not unexpected but something I did not know. As you can see, the temperature changes between 3.5C and 5.5C in the fridge in the night when the door is not opened (because the fan is not working, there has to be a temperature gradient inside but I measure only at the bottom shelf). The fridge is set to 4C so obviously it is getting warmer and the control kicks in and it is kept in I think a tight range. Also, it can be said that it takes 1h for internal temperature to increase 2C (from 3.5C to 5.5C) and then decrease 2C (from 5.5C to 3.5C) in also 1h.
The day use of the fridge
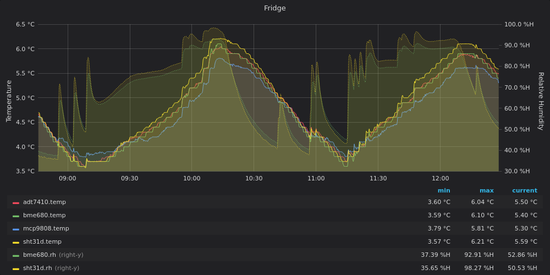
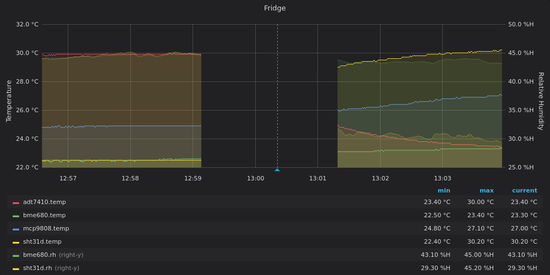
The fridge in the day
This is a bit difficult to interpret. I did not put any annotations but when you see a jump on relative humidity (dashed lines), it is when the door of the fridge is opened. It is not surprising the relative humidity increases as the air in room temperature entered into the fridge but the temperature does not change that quickly. So I think it is not easy to interpret this without knowing more.
Deep freeze compartment
This is an interesting one. Because I expect things to work normally until 0C, but what about subzero, and particularly close to -20C ? I do not know what I was expecting but it is I think surprising to see a prototype working fine at -18C.
RPi, battery and the sensors in the deep freeze compartment
You can also see that there is not much difference between the reported values from each sensor. Also, it can be seen that at least 1h is required for sensors to adapt deep freeze compartment and then to ambient temperature. Both the sensors and the fridge seem to be quite accurate, the temperature in the deep freeze compartment is -18C, which is the correct deep freezing temperature.
I have also taken a thermal image of the setup just after I took them out from the deep freeze compartment.
RPi, battery and the sensors just after staying in the deep freeze compartment
Like the thermal images before, it is easy to see that the RPi and all the cables are warmer than the sensors and the environment.
Relative humidity
Two of the sensors I use also measure relative humidity as you can see in the graphs. However, relative humidity is I think more difficult to talk about than the temperature. Because it depends on the temperature by definition. It means if you change the temperature it changes, if you have a temperature measurement error that means you also have a relative humidity measurement error. So I measured it but I think I cannot say much about it. It seems like when the door is opened, relative humidity increases rapidly and there is no or very small change in the temperature, but I am not sure this interpretation is correct.
Conclusion
Here are the lessons I learned from this experiment:
- It is quite easy to construct a high quality indoor environment monitoring system with Raspberry Pi.
- The temperature sensor location in the system is very important.
- IC temperature sensors are pretty easy to use, precise and probably accurate.
- Raspberry Pi based system can work in subzero temperatures, at least up to -18C.
- Sometimes you really need a proper tool, such as a thermal camera in this experiment, to investigate a problem.
- Not surprisingly, temperature is controlled tightly in the fridge.
- It seems opening the door of the fridge for a short time does not change the temperature inside the fridge much. This is probably true for the bottom shelf, but the top shelf should have more fluctuation, since the warm air rises.
This work is licensed under a Creative Commons Attribution-NonCommercial-ShareAlike 4.0 International License.